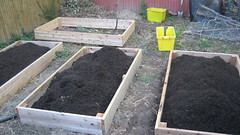
Finally, I settled on using county leaf mulch. That stuff is ground up pretty good and we have been putting it on the side of the house where it turned into good black compost in not too long. For years I have been driving down to the Free Mulch site down on S. Taylor street. Been stinkin up the car bringing load after load up that hill. But this time, we had it delivered. It cost $40 I think, but was very much worth it. We got the full load...which wa s alot bigger in real life than in the pictures. Took two solid days to move it all into the beds. Now it just needs to turn into compost. Not sure about that part. At the very least, the layer down near the dirt should turn.

Sunday, January 30, 2011
Filling the Raised Beds
One of the things holding me back from doing the raised beds thing was not knowing what to fill them with. Composting wasn't producing enough. Couldn't use the dirt we have in the yard - mostly clay. I wasn't going to buy that much composted material. that stuff is way too expensive for something you can just make.
Thursday, January 27, 2011
Raised Beds
Built these raised beds this Summer and Fall. I became convinced that this is the way to go after struggling with the clay and fill dirt in the yard for about three years. Also - my wife had been prodding me to go this direction for a while.

Each bed took about half a day to build - though I usually spread the work out over a weekend. I, more or less, followed the advice outlined at this site. I liked the idea they had of using PVC piping to make a little structure over the beds that could hold clear plastic or row cover...I haven't done that yet, though. Next year maybe. It was very useful having two drills - one for making the holes and a smaller rechargeable for installing the screws. I also needed two pretty big clamps for when the wood was warped. Beer was also pretty helpful....always goes well with power tools. Photos of the all big bed buildin' action are here.
The wood is untreated cedar and a little pricy. But still cheaper than buying ready made beds. The only place I could find it was ABC Distributors in South Arlington right near the Weenie Beanie. Yup...I said, Weenie beanie.
The cedar seems to come in a couple different levels of quality and if I could go back in time, I would go for the better stuff. I would have also asked if they could have ordered me some more 2 x 6's instead of the 2 x 4's I was mostly using. That would have helped with the cost I believe.
I made 8 beds: one at 2x10, 2 beds at 2x5, 4 beds at 4x8 and one at 4x6. And those are feet. Most are about 11 inches high. I was aiming for about 2 feet in between, but went a little smaller in some places to grab more sun.
The first one was assembled in place. Very bad idea. Better to build and later move.
One odd thing I learned is 2x4s and 4x4s aren't actually the size they say. 2 by 4's are more like 1.5 x 3.5. 4x4s...I am guessing they are more like 3.5 by 3.5. I guess the 2x4 designation refers to their size before they get dried or cooked or whatever happens before it gets to you. All my life I thought 2 by 4s were 2 by 4. But nope.
Later we will cover the paths with cardboard and then perhaps wood mulch. That is the plan anyway.
Solving the Rat & Possum Problem

Got this here composter from Hayneedle. Recycled plastic, made in USA or Canada. Has handles for turning. Turning is not too hard...though I wonder about when it gets fuller. It holds 52 gallons I think - 7 cubic feet of compost. Assembled very easily.
One thing I like about it is the compost tea collection system. The stand or barrel holder (which has wheels to facilitate turning) also collects compost tea. There is a spigot on one end and theoretically, come summer time, I just turn that for a big hearty glass of compost tea. Yum! The thing makes claims to turn compost to soil in 2 weeks. I will believe that when I see it. I have been adding county leaf mulch and regular dirt as instructed - the included manual says 2/3 ought to be "browns." Mike McGrath (who seems to hate compost) says the ratio should be even higher.
It is low to the ground and so has a low profile and also seems very sturdy. I have seen some on higher rigged systems that seem too complicated.
Price was reasonable (120something including my coupon). Shipping was free I think. And if you bide your time, they go on sale or these coupon codes seem to pop up here and there...as if the interweb knows what you been searching. I will see how this works out and get another later if it goes well.
So far no rodents have interfered with it, though at the start, when it turned easily, I think a few squirrels took joy rides on it.
Hawk Eating Rat
hawk eating rat
Originally uploaded by okfuskee
Why did I have rats? Well, Living just off Columbia Pike in Southern Arlington (Yes, the better half!) presents some interesting benefits and challenges. And rats are apparently one of them. I was using one of Arlington county's $17 composters (well it was $10 when I bought it actually) and...it was just too tempting for the rats. Those things are open at the top and the the old version which I had had pretty big holes in it...and even if it didn't some of my rodent friends can chew the holes bigger anyway. This thing brought lots of visitors. Mr. Rat and Mr. Possum were my least favorite. At least there is one less rat now. Come to think of it, there is also one less possum....but that is a story for another day.
Subscribe to:
Posts (Atom)